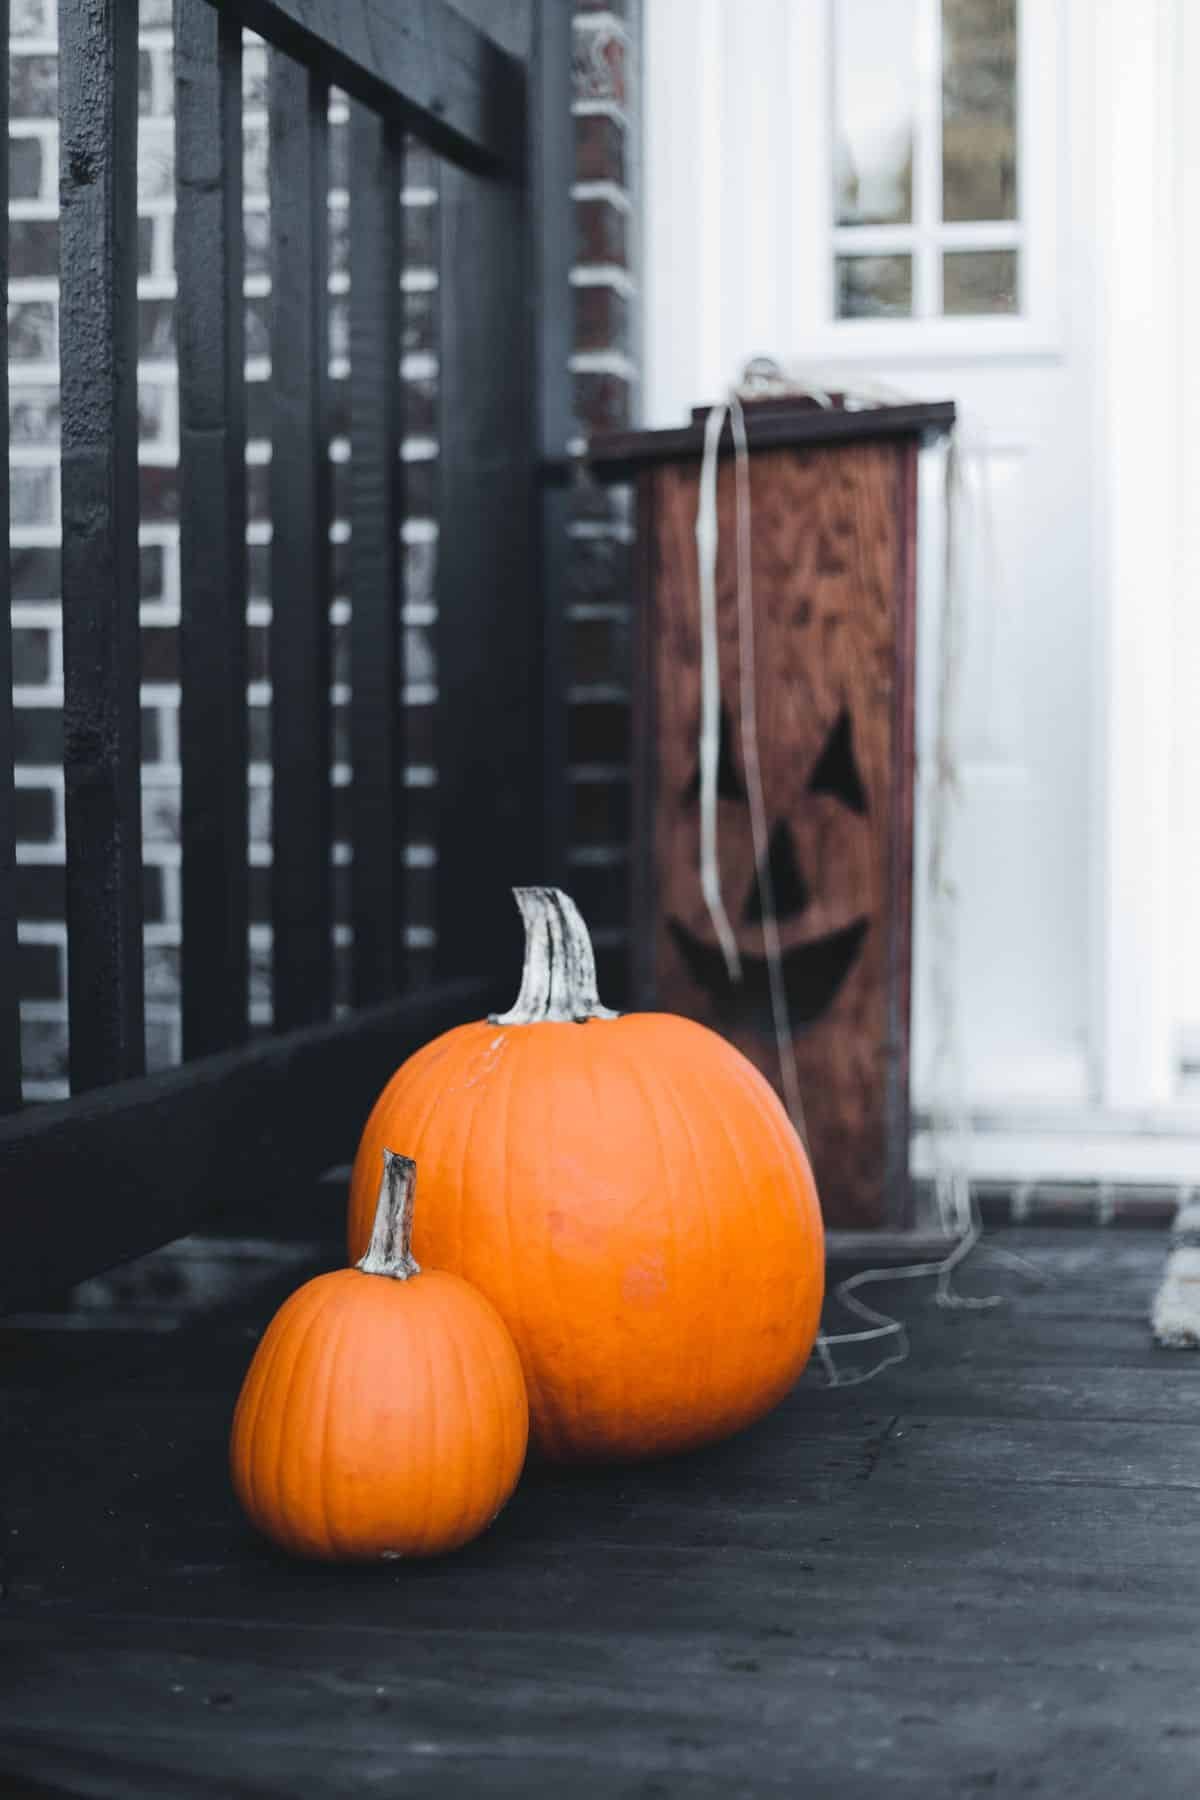
Front porch pumpkin display ideas
Pumpkins are the undisputed stars of fall porches, and a well-designed pumpkin display turns an ordinary entryway into an autumn showpiece. But great pumpkin displays go far beyond lining up orange orbs on the steps. This guide explores creative arrangements, color palettes from classic to unexpected, carving versus no-carve options, stacking techniques, lighting, and maintenance, across 20 practical sections that will make your porch the street’s standout.
The secret to stunning pumpkin displays is thinking like a designer: vary sizes, colors, and heights; group in odd numbers; layer from large to small; and anchor the composition with complementary elements like mums, hay, and lanterns. A single $4 pumpkin looks lonely, but seven pumpkins in mixed sizes and colors, arranged with intention, look like a magazine shoot. This guide covers everything from budget-friendly basics to elaborate showstoppers, with honest advice on what lasts, what photographs well, and what is worth the effort. Whether you have a grand wraparound porch or a tiny stoop, there is a pumpkin display idea here for you.
One thing to know upfront: real pumpkins are perishable decor. An uncarved pumpkin lasts 8 to 12 weeks in cool weather; a carved jack-o’-lantern lasts 5 to 10 days. Planning your display around these timelines, and knowing preservation tricks, keeps your porch looking fresh from early fall through Thanksgiving. This guide includes the maintenance schedule that professionals use, so your display peaks when it matters most. Let us build something beautiful.
Why Pumpkins Rule Fall Porch Decor
Pumpkins dominate autumn decorating for good reasons. They are affordable, widely available, and come in an astonishing range of sizes, shapes, and colors beyond basic orange. They are versatile, working for Halloween spookiness, Thanksgiving harvest, and general fall beauty with simple styling shifts. They are photogenic, their round forms and rich colors popping in photos. And they are temporary in the best way: no storage needed, just compost when done. A porch without pumpkins in October looks unfinished; a porch with a thoughtful pumpkin display looks intentional and welcoming. They are the fastest way to signal the season.

Choosing Pumpkins: Sizes, Shapes, and Varieties
Variety creates visual interest. Mix sizes: one or two large statement pumpkins (20+ inches), several mediums, and a scattering of minis. Explore varieties beyond field pumpkins: Jarrahdale (blue-grey), Rouge Vif d’Etampes (deep red-orange), Baby Boo (white mini), Fairytale (tan, deeply ribbed), and Long Island Cheese (pale, squat). Each brings unique color and texture. Look for firm pumpkins with intact stems; avoid soft spots, which signal rot. The stem, or handle, adds character, so choose pumpkins with interesting curly stems. Buy more than you think you need; having extras lets you curate the perfect arrangement and replace any that spoil early.

Classic Orange: The Timeless Pumpkin Porch
There is a reason classic orange endures: it is bold, cheerful, and unmistakably autumn. Build the timeless look with orange pumpkins in varied sizes cascading down your steps, largest at the bottom, smallest at the top. Add yellow and white mums for contrast, and a hay bale or two for rustic structure. Keep it symmetrical for formal homes, asymmetrical for casual charm. This classic composition photographs beautifully and pleases everyone, from toddlers to grandparents. It is also the easiest to shop for, since orange pumpkins are everywhere. Sometimes the traditional choice is traditional because it works perfectly.

White and Neutral Pumpkin Displays
For elegant, modern fall style, go neutral. White pumpkins (Baby Boo, Lumina, Casper varieties) create a sophisticated, almost wintery look that suits contemporary homes. Combine whites with pale greens, soft blues (Jarrahdale), and natural textures like eucalyptus, linen, and weathered wood. This palette feels fresh and unexpected in a sea of orange porches. It also transitions beautifully into November, reading as harvest-elegant rather than Halloween-specific. Style with black lanterns or matte black planters for striking contrast. Neutral pumpkin displays photograph like high-end styling because restraint reads as luxury.

Moody and Dramatic: Dark Fall Palettes
Embrace the dark side of autumn. Deep green, black (yes, black pumpkins exist, or paint them), burgundy, and bronze pumpkins create a moody, sophisticated display. Add dark foliage, black candles, and antique brass lanterns. This palette suits Victorian homes, modern dark exteriors, and anyone tired of cheerful orange. For Halloween, it is naturally spooky without being kitschy. Paint real pumpkins with matte black or deep plum craft paint for custom colors; the paint also seals and preserves them. Moody displays stand out precisely because they reject fall’s typical brightness, proving that autumn has a dramatic, mysterious side worth celebrating.

Stacking and Tiering Techniques
Height variation makes displays dynamic. Stack pumpkins in towers: largest on the bottom, decreasing sizes upward, three high maximum for stability. Use overturned pots, crates, or hay bales as risers to elevate back rows. Stair-step arrangements down porch steps create natural cascading flow. For top-heavy stacks, insert a wooden dowel through the centers for stability, hidden from view. Secure stacks on windy porches with museum putty between layers. Tiered displays draw the eye upward and make even small pumpkin collections look abundant. The goal is a landscape, not a lineup; think rolling hills, not soldiers in formation.

Carved vs. No-Carve: Pros and Cons
Carved jack-o’-lanterns bring Halloween magic but demand maintenance. Pros: traditional, fun for kids, gorgeous when lit. Cons: last only 5 to 10 days, attract insects, require carving time. No-carve decorating, painting, decoupage, drilling patterns, stacking, lasts the whole season with zero rot acceleration. The smart strategy: build your main display with uncarved pumpkins in early fall, then add a few carved jack-o’-lanterns in the final week before Halloween. This gives you the best of both: long-lasting beauty plus Halloween spirit. For carved pumpkins, apply petroleum jelly to cut edges to slow decay, and bring them in during hard freezes.

No-Carve Pumpkin Decorating Ideas
Skip the knife and get creative. Paint pumpkins with chalk paint for matte, modern color. Use stencils for patterns: damask, polka dots, or monograms. Decoupage with fall napkins or tissue paper for intricate designs. Drill holes in patterns for a lantern effect that lasts longer than carving. Wrap with twine, ribbon, or lace for texture. Add faux flowers, succulents, or moss to the tops as living toppers. Stud with upholstery tacks for glamorous texture. These techniques last the full season, suit all skill levels, and often look more sophisticated than traditional carving. No-carve is also safer for young children to participate in.

Pairing Pumpkins with Mums and Flowers
Mums are pumpkins’ best friends. Their mounding blooms fill gaps between pumpkins and add color at a different height. Choose mum colors that complement your pumpkin palette: rust and gold mums with orange pumpkins, white and burgundy with neutral pumpkins. Place mums in decorative pots, not nursery containers, for a finished look. Add ornamental cabbage, kale, or pansies for extended color. Dried elements, wheat bundles, corn stalks, add height behind the pumpkin-mum layer. The formula: pumpkins ground the display, mums fill the middle, tall dried elements provide the backdrop. This trio never fails because it mirrors nature’s own autumn layering.
Porch Steps: Cascading Pumpkin Arrangements
Steps are nature’s display shelves. Arrange pumpkins cascading down each step: larger at the bottom, smaller toward the top, in loose clusters of three or five. Leave walking space, safety first, decor should frame the path, not block it. Alternate sides for rhythm, or mirror both sides for symmetry. Tuck small gourds and pinecones into gaps. Add a lantern or two among the pumpkins for evening glow. For wide steps, create deeper arrangements with back rows elevated on hidden bricks. Step displays are visible from the street, maximizing curb appeal. They also photograph beautifully from a low angle, making your home look like an autumn postcard.

Small Porch and Stoop Solutions
Limited space demands editing, not surrender. Choose three to five pumpkins in varied sizes rather than a crowd. Use vertical space: a tall planter with pumpkins stacked beside the door. Hang a fall wreath to draw the eye up. A single statement pumpkin, an enormous heirloom or a beautifully painted design, can carry a small stoop alone. Wall-mounted lanterns add glow without floor space. Keep the palette tight for cohesion in close quarters. Small porches actually photograph better than large ones; every element is visible and intentional. Constraints breed creativity, and a perfectly styled stoop charms more than a sprawling but chaotic porch.

Lighting Your Pumpkin Display
Lighting transforms pumpkin displays after dark. Inside carved pumpkins, use LED candles or string lights, never real flames near dry decor. Uplight uncarved displays with ground spotlights for drama. String lights woven through the arrangement add sparkle. Lanterns with LED pillars provide flickering warmth safely. For Halloween, colored lights (orange, purple, green) amplify spookiness. Solar lights charge by day and glow by night with zero wiring. Timer plugs ensure your display shines from dusk without manual effort. A lit pumpkin display is a neighborhood beacon, visible and magical from the street. Do not skip lighting; it doubles your display’s impact for minimal cost.
Halloween Pumpkin Displays
For maximum Halloween impact, layer spooky elements onto your fall base. Carved jack-o’-lanterns with varied faces, silly to scary. Faux spider webs draped over the pumpkin piles. A skeleton lounging among the gourds. Witch hats perched on large pumpkins. Black crows or rats tucked into arrangements. Fog machines for haunted atmosphere on trick-or-treat night. Keep the underlying fall display intact; Halloween additions should be removable, revealing Thanksgiving-ready decor on November 1st. This two-phase approach means one shopping trip serves two holidays. Balance spooky and tasteful based on your audience; young trick-or-treaters prefer fun over frightening.

Thanksgiving Transition: From Spooky to Harvest
After Halloween, transition to Thanksgiving elegance. Remove spooky elements, carved pumpkins past their prime, webs, and skeletons. Add more natural elements: pinecones, acorns, dried leaves, and wheat. Introduce warm textiles: plaid throws on porch seating, burlap runners. A “thankful” or “gather” sign adds seasonal messaging. Shift lighting from colored to warm white. The pumpkins themselves, especially heirloom varieties, read as harvest, not Halloween, once context changes. This transition takes under an hour but completely refreshes the porch for November entertaining. Your Thanksgiving guests deserve a welcoming entry, and this delivers it.
Preserving Pumpkins for Longer Displays
Extend your pumpkins’ life with these tricks. Start with healthy pumpkins: firm, no soft spots, intact stems. Keep them cool; heat accelerates rot, so shaded porches beat sunny ones. Elevate pumpkins off wet surfaces with pot feet or straw to prevent bottom rot. For carved pumpkins, soak in a bleach-water solution (1 tablespoon per gallon) for a few hours to kill decay microbes. Apply petroleum jelly to cut surfaces. Bring carved pumpkins indoors during freezes and heat waves. Check weekly and remove any rotting specimens before they affect neighbors. With care, uncarved pumpkins last into December; carved ones give you a solid week of glory.

Faux Pumpkins: When and Why
Faux pumpkins have earned their place. Pros: last forever, no rot, no pests, carve-able foam versions exist, perfect for early decorating (August) without spoilage. Cons: upfront cost ($5-$25 each), can look plasticky if cheap, lack authentic heft. Best uses: high, out-of-reach spots where real pumpkins are impractical; intricate carved designs you want to reuse yearly; allergy-sensitive households. Mix faux among real for the best of both; place faux in the back, real in front where texture matters. Quality varies enormously; invest in realistic foam or resin pumpkins from craft stores rather than dollar-store plastic. Stored properly, faux pumpkins serve for a decade.

Budget Pumpkin Porch Ideas
Stunning does not mean expensive. Shop farm stands and patches for the best prices, often half of grocery store costs. Buy “seconds” with minor blemishes at a discount; turn flaws to the back. Use what you have: baskets, crates, and blankets as risers and backdrops. Limit your palette to reduce the number of specialty varieties needed. DIY painted pumpkins cost pennies in craft paint. Borrow from nature: free pinecones, branches, and leaves fill gaps beautifully. A $30 budget buys 8 to 10 pumpkins at farm stands, enough for a charming display. The most expensive pumpkin porch is rarely the most beautiful; creativity outshines cash every time.

Pumpkin Display Safety Tips
Keep beauty safe. Do not block walkways, steps, or railings; guests need clear paths. Use LED candles only inside pumpkins; real flames near dried corn stalks, hay, or leaves are fire hazards. Secure stacked pumpkins against wind and curious toddlers. Keep displays away from grills and fire pits. If using real carved pumpkins, discard at the first sign of mold to avoid attracting pests. Ensure house numbers remain visible for emergency services. These precautions are simple but essential; a beautiful display that creates hazards is a failed display. Safety and style coexist easily with minimal planning.

End-of-Season: Composting and Cleanup
When pumpkins soften, compost them. Chop into pieces and add to compost bins; they break down quickly, adding valuable nutrients. Many farms and zoos accept donated pumpkins as animal feed, check local options. Do not leave rotting pumpkins on the porch; they stain surfaces and attract pests. Clean the porch with a mild bleach solution to remove any residue. Store reusable elements, faux pumpkins, lanterns, risers, clean and dry. Note what worked for next year’s planning; photos of this year’s display are invaluable references. The cycle completes beautifully: this year’s porch stars become next year’s garden nourishment.

Photographing Your Pumpkin Display
Document your creation. Golden hour light makes orange pumpkins glow. Shoot from the street for the full composition, then close-ups of interesting details: painted designs, stacked towers, lantern glow. Overcast days provide even light that flatters all colors. At dusk, capture the display lit for magical twilight shots. Include your home’s architecture for context. Share on social media with fall hashtags; pumpkin porches are endlessly popular content. These photos become next year’s inspiration and a lovely seasonal memory. Take pride in your work; a beautiful pumpkin display is a gift to the whole street.
The bottom line: A great front porch pumpkin display blends variety, intentional arrangement, and seasonal layering. Mix sizes and colors, build height with stacking, complement with mums and lighting, and maintain through the season. Your porch will glow with autumn warmth from the first crisp day to Thanksgiving.

I am Talha Sikandar, a professional writer with a passion for general blogging. With years of experience in content writing and research, I founded Meaniingly.com to deliver well-researched, informative, and user-friendly articles on diverse topics.